For authoritative references, see Dr. Ian Howell and Kayla Gautereaux's Soundjack bootcamp video archive, Dr. Ian Howell's comprehensive Soundjack guide, and Dr. Alex Carôt's 10 commandments.
If you would like to share a customized version of this page, you can use parameters appended to the URL.
Choose in the tables below the configuration options you'd like to use. Default values are indicated in bold. Then, press the reload button underneath the tables.
headworn (condenser)
sideaddress (condenser)
dynamic (e.g. SM58)
omni (omnidirectional condenser)
1 (🎹) 0 (no)
1 (mono)
2 (stereo)
shop
setup
stage
server
initial_setup
os
vid
1 (show)
0 (hide)
1 (show)
0 (hide)
classic
lite
1 (start up mass server) 0 (don't)
1 (include)
0 (omit)
mac
win
vdo (VDO.Ninja)
zoom
groupName
guideName
Default: ExampleGroupName
Default: ExampleGuideName
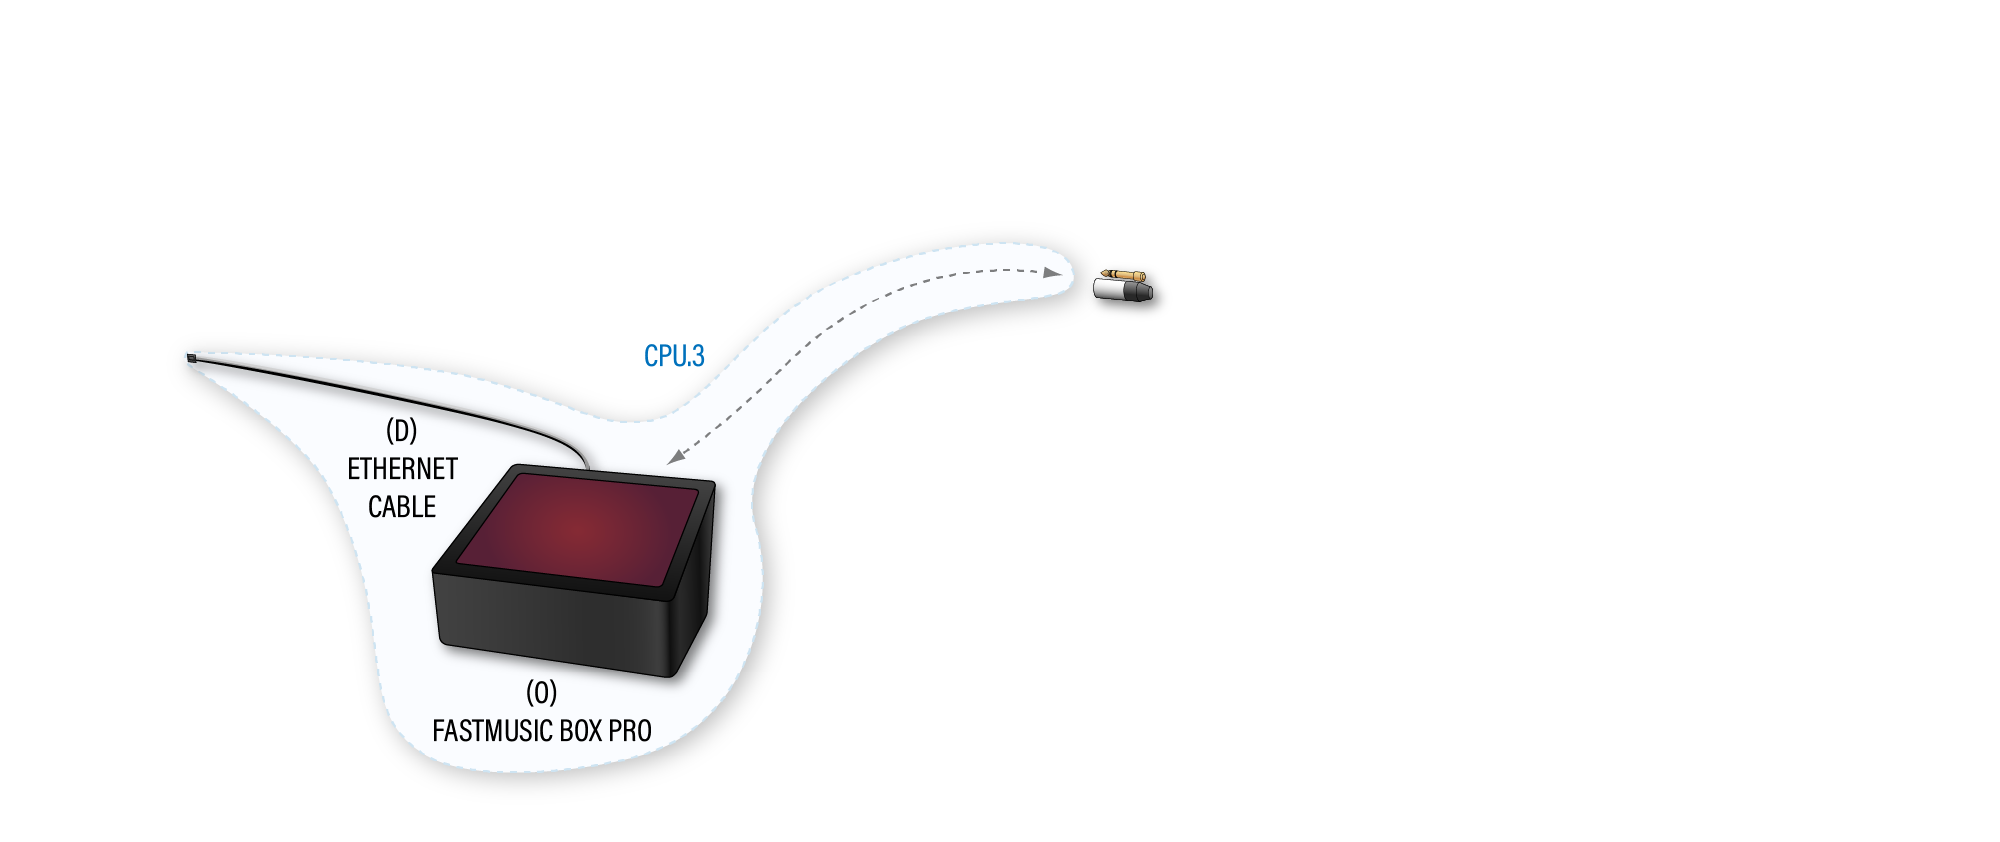
FMB Pro placeholder content was added to this page 2022 January 30. I don't have an FMB Pro and haven't had a chance to make sure that the FMB Pro instructions are correct.
Shopping list: Total > $0.00
Connectivity
Computer and USB Audio Interface
Microphone and headphones
Broadband, low-jitter internet connection
You have fiber-optic internet.You have cable internet.Note: DSL might also work, but will likely require contacting the phone company to disable interleaving; a technician might be dispatched to move copper wiring around to reduce line noise.
Home networking
(A) Main router that can be reached by Ethernet cable from computer without repeater/extender (B) Ethernet cable ft Ethernet hub Ethernet switch (if it is preferred to run a single cable for most of the length between the router and computer)
(C) Computer
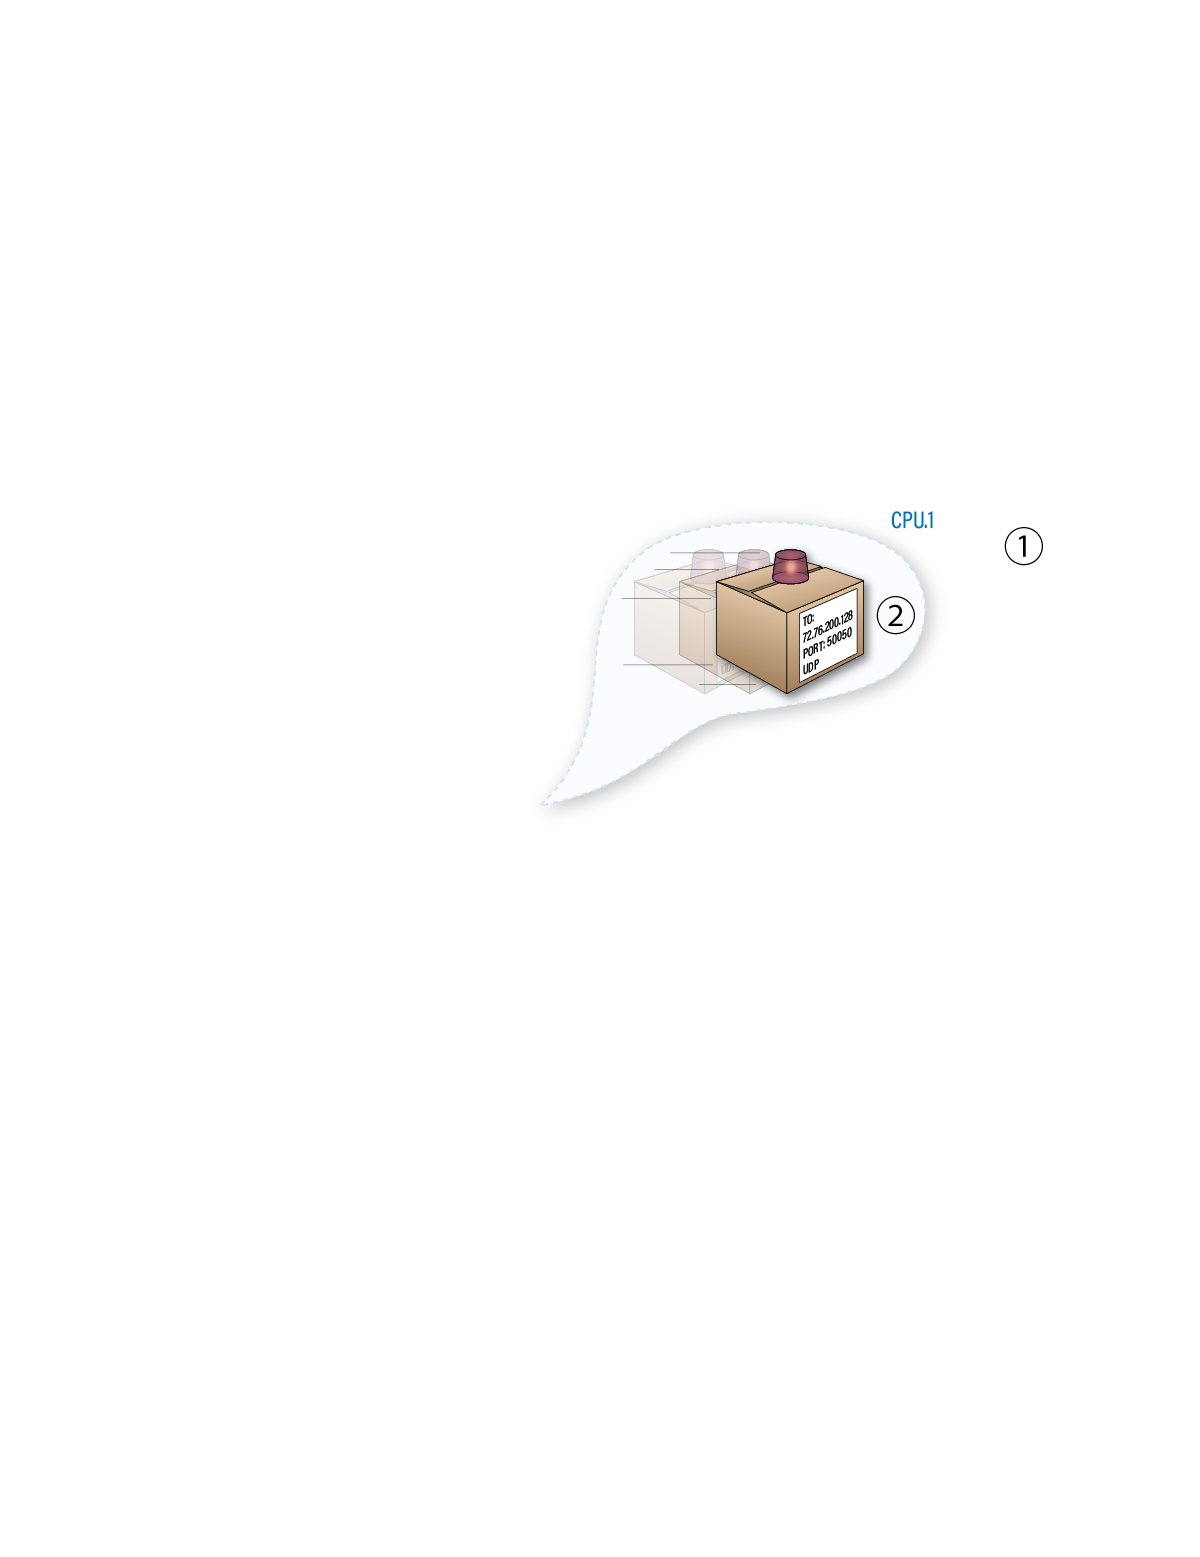
CPU.1
Soundjack and video will run on the computer. An additional fastmusic box will not be used.
≳ 4-core vintage 2017 laptop Core i7
The processor need not carry the i7 moniker. For example a desktop quad-core Core i3-8100 @ 3.60 GHz and a laptop quad-core Core i7-8650U @ 1.90 GHz have comparable benchmarks. If a CPU has at least 4 cores and a benchmark at least in the 6200ish range, I think the CPU is fast enough for Soundjack (assuming some other process isn't hogging CPU).
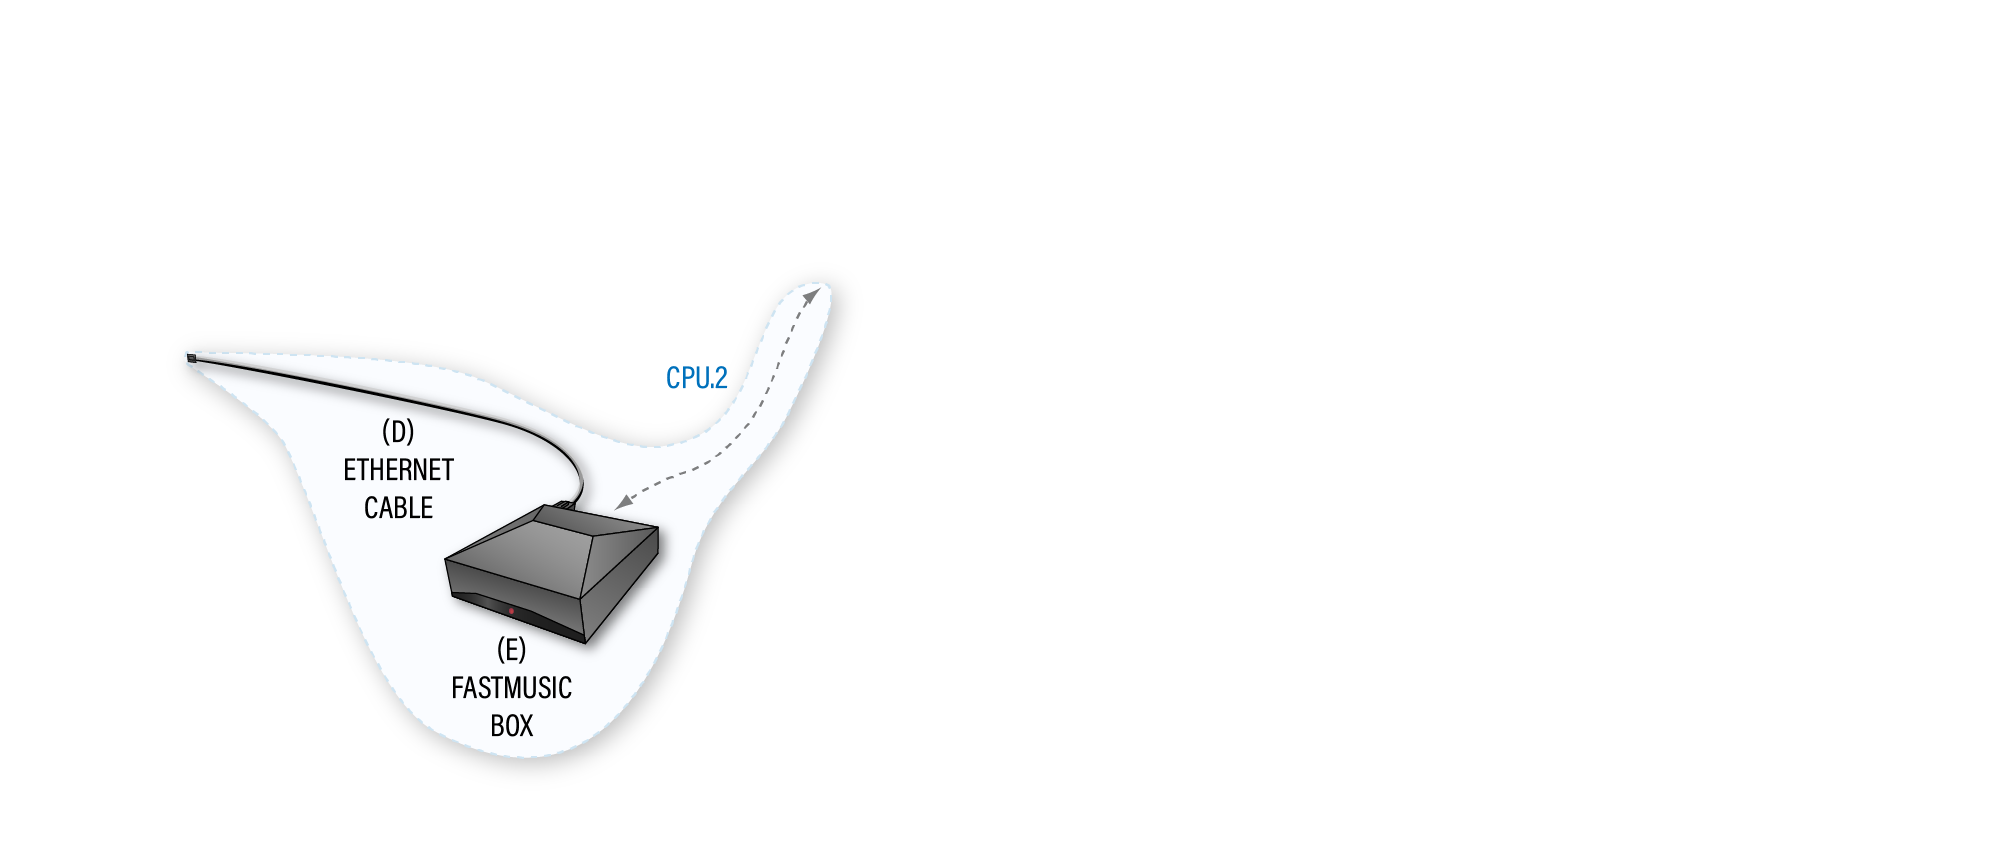
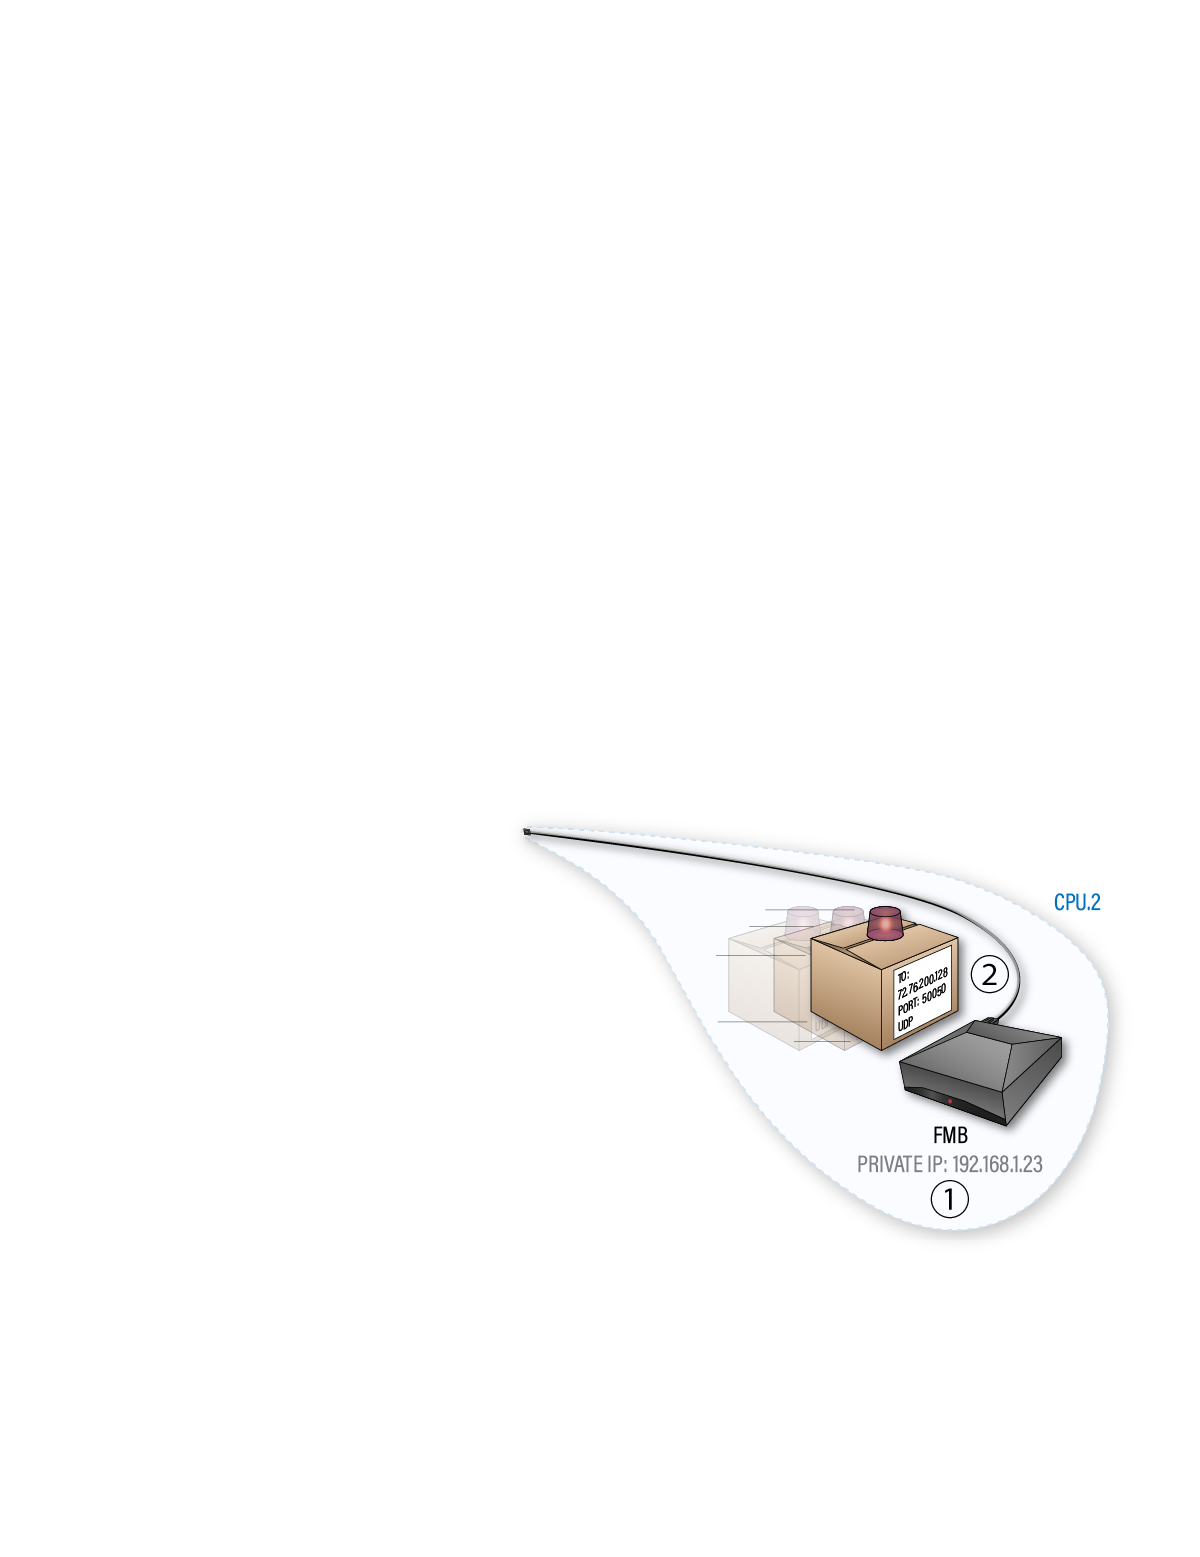
CPU.2
Soundjack will run on a fastmusic box. The computer will be used for video.
A separate USB audio interface need not be purchased to use your audio equipment with the FMB Pro. However, you might still wish to buy a USB audio interface so you can use your audio equipment with your computer (e.g. work from home) at other times.
CONNECT: computer → Ethernet/USB hub(if needed) → Ethernet cable(OK to use switch & 2nd cable) → main router.
On your computer, turn WiFi OFF.
Make sure that no VPN is being used (including through computer settings as well as through the router).
CPU.1 (for users not using a FMB)
CONNECT: → USB cable → computer(by way of Ethernet/USB hub is OK).
CPU.2 (for FMB users)
CONNECT: FMB → Ethernet cable(OK to use switch & 2nd cable) → main router.
CONNECT: → USB cable → FMB.
Is your FMB's power adapter already connected to wall power?
Yes:If your FMB is not yet ON,click your FMB's power button to turn your FMB ON.
No: CONNECT FMB → FMB's power adapter → power outlet. Some FMBs are configured to power on upon connecting to wall power. If your FMB does not automatically power on upon connecting to wall power, click your FMB's power button to turn your FMB ON.
Check that your FMB's red LED is lit.
CPU.3 (for FMB Pro users)
CONNECT: FMB Pro → Ethernet cable(OK to use switch & 2nd cable) → main router.
Is your FMB Pro's power adapter already connected to wall power?
Yes:If your FMB Pro is not yet ON,click your FMB Pro's power button to turn your FMB Pro ON.
No: CONNECT FMB Pro → FMB Pro's power adapter → power outlet. Some FMBs are configured to power on upon connecting to wall power. If your FMB Pro does not automatically power on upon connecting to wall power, click your FMB Pro's power button to turn your FMB Pro ON.
Check that your FMB Pro's red LED is lit.
After about 30 seconds, the touchscreen will display the Soundjack STAGE and FMB Pro navigation buttons.
Space for STAGE
The instructions on this page describe a sequence of tasks to be carried out on the Soundjack website as viewed through a Vivaldi/Chrome browser tab on a computer. This same sequence of tasks can be, instead, carried out on the Soundjack website as viewed through the FMB Pro's touchscreen.
The instructions on this page refer to LLL shortcut/bookmark shortcut 4 fmb menu, which opens http://soundjack0.local. The same webpage can be opened on your FMB Pro by tapping the button on your FMB Pro's touchscreen.
On the FMB Pro, ensure that 48-V phantom power is OFF.
CPU.1 (for users not using a FMB) > Windows > One-time/occasional
These instructions are for changing a Windows registry entry so that Soundjack can use Focusrite Scarlett USB audio interfaces with lower buffer settings (otherwise rhythmic interaction is not possible). The instructions are lightly adapted from Jörg Spix's post at Soundjack Support Form Post # 4780.
Right-click on the SetAltStreamingMode.bat file and select "Run as admin".
Disconnect your Focusrite Scarlett from your computer.
Wait five (5) seconds.
ReCONNECT:Focusrite Scarlett → computer.
MIC.1 (for headworn condenser mic users)
For each microphone, CONNECT: FMB Pro → XLR cable → in-line preamp → headworn condenser mic.
On the FMB Pro, turn 48-V phantom powerON.
MIC.2 (for side-address condenser mic users)
For each microphone, Check STABILITY: side-address condenser mic securely mounted on stand.
For each microphone, CONNECT: FMB Pro → XLR cable → side-address condenser mic.
On the FMB Pro, turn 48-V phantom powerON.
MIC.3 (for dynamic mic users)
For each microphone, Check STABILITY: dynamic mic securely mounted on stand.
For each microphone, CONNECT: FMB Pro → XLR cable(possibly using an XLR splitter) → dynamic mic.
On the FMB Pro, check that the input gain for the XLR jack is set to a reaonsable level (if possible, use a level that was successfully used in a previous rehearsal).
MIC.4 (for omnidirectional condenser mic users)
Check STABILITY: omnidirectional condenser mic securely mounted on stand.
CONNECT: FMB Pro → XLR cable → omnidirectional condenser mic.
On the FMB Pro, turn 48-V phantom powerON.
CONNECT: Each pair of headphones → headphones splitter → FMB Pro.
On the FMB Pro, check that the headphones monitoring level is set to a reasonable level (if possible, use a level that was successfully used in a previous rehearsal).
🎹 Connecting a digital piano
CONNECT: digital piano L(MONO) output → 1/4"-to-1/4"XLR (male) cable → FMB Pro.
For stereo, separately CONNECT: digital piano R output → 1/4"-to-1/4"XLR (male) cable → FMB Pro.
If your USB Audio Interface, the , has a LINE/INST button, make sure that the LINE/INST setting is LINE for the inputs used for connecting the digital piano.
If you would like to hear your digital piano through your headphones, on the , you should ensure that direct monitoring is ON.
If you would like to hear your digital piano through your headphones, on the FMB Pro, you should ensure that the local audio level is not zero.
Open the link provided by your low-latency project chief (if you have one) in Vivaldi/Chrome.
If you have no low-latency project chief, please feel free to open the link in the above step. Just beware that in subsequent steps, you could end up in a video chat with random strangers who did the same 😊.
Save a bookmark/shortcut to your desktop (or somewhere else you will remember to look) by using the following steps:
For either Vivaldi or Chrome, you can add a bookmark to your bookmarks bar by clicking the bookmark icon (Vivaldi: bookmark, Chrome: star) in the URL/location bar.
For Chrome, you can make a shortcut icon in your file system (e.g. desktop):
Click the three vertical dots (⋮) near the top-right corner of the window.
Choose More tools > Create Shortcut.
Click "Create".
macOS: Chrome places the shortcut in the Chrome Apps folder. Drag the newly-created LLL shortcut from the Chrome Apps folder to the desktop(or a preferred alternative folder where you will remember to look)
⚠ Please do NOT share the meeting link with people outside your musical group. The shortcuts can contain information that allows access to your group's meeting.
Part Account settings for classic stage users (one-time/occasional)
Register for a Soundjack account (already done if you purchased a prebuilt FMB/FMB Pro from Symonics GmbH)
Use your group's LLL bookmark/shortcut shortcut 5 Soundjack to open https://soundjack.eu in a new Vivaldi/Chrome tab.
In masthead (banner at top of webpage), click "REGISTER".
Follow the instructions to set up an account. Soundjack emails sometimes get sent to the Spam folder for me in gmail. Please check your spam folder.
Join Soundjack group
Once you are logged into https://soundjack.eu, go to the navigation banner at the top of the page, and hover over "GROUPS".
Click "GROUPS PANEL".
Find in the list of groups.
Click "Request Membership".
Thank you. A moment. I will approve your request.
Part Router settings (one-time/occasional)
It's not always necessary to explore the router settings, but optimizing settings now can help us to avoid headaches that can potentially occur when trying to troubleshoot issues when attempting to connect with multiple people later. Video-walkthroughs of router settings are available at Dr. Ian Howell and Kayla Gautereaux's video bootcamp archive.
Dear Router,
Router settings
➀
Permanently assign my
computer an only-within home network IP address of 192.168.1.12FMB an only-within home network IP address of 192.168.1.23FMB Pro an only-within home network IP address of 192.168.1.23
. Don't let any other household device use that only-within home network IP address.
⚠ You don't have to carry out this step, but if you don't then you might have to repeat step ➁, possibly as frequently as, in principle, every single time your
computerFMBFMB Pro
reconnects to the router.
Home network
> Create DHCP reservation
> Assign your computerFMBFMB Pro(possibly identified in router settings using a nickname or MAC address) a static private IP address of 192.168.1.12192.168.1.23192.168.1.23.
⚠ Setting up a static private IP for your
computerFMBFMB Pro
is different from getting a static public IP for your router.
➁
Whenever you receive a packet via UDP for port 50050, send that packet onward to within-home network IP address
192.168.1.12 (my computer)192.168.1.23 (my FMB)192.168.1.23 (my FMB Pro)(even if the inbound packet is not preceded by an outbound packet to make it obvious that the inbound packet really is intended for
192.168.1.12 (my computer)192.168.1.23 (my FMB)192.168.1.23 (my FMB Pro)
).
Home network
> Set up a port-forwarding rule to forward all packets received via UDP at port 50050 to 192.168.1.12 (my computer)192.168.1.23 (my FMB)192.168.1.23 (my FMB Pro)
port 50050.
➂
When any other device on the home network competes with my
computerFMBFMB Pro
to send/receive packets of information to/from the outside world, put an emergency-vehicle light on each packet to/from my
computerFMBFMB Pro
that lets packets to/from my
computerFMBFMB Pro
"cut the line" and be transmitted while packets to/from other devices on the home network wait.
Home network
> QoS (Quality of Service)
> Assign your computerFMBFMB Pro(possibly identified according to Ethernet port number)Highest priority.
Part Preparing the computer
Quit any applications that might hog CPU and/or bandwidth (including while carrying out uncommanded background tasks). The table below lists some examples of potential CPU/bandwidth hogss:
Type of application
Example
Comment
File system indexer
macOS: Spotlight indexing (look for mds in Activity Monitor)Windows: Windows Search Indexer
macOS: You can wait until an index being built is built. Another option is to disable indexing.Windows: Kill search indexer (you can also permanently disable indexing).
Cloud file storage synchronization
DropBox background synchronization and software updates
Quit DropBox
Productivity/creativity suite maintenance
Adobe Creative Cloud background software updates
Quit Adobe Creative Cloud (might need to force quit)
Malicious software scanner/remover
Malware Bytes
Quit Malware Bytes for duration of rehearsal
Anti-virus package
Real-time scanning macOS 11 Big Sur: Bug related to camera/microphone monitoring in Sophos Anti-Virus package that causes excessive CPU usage
Disable real-time scanning for duration of rehearsal macOS 11 Big Sur: (I think the Sophos bug is resolved now).
Clear your Vivaldi/Chrome browser cache by using a key combination (macOS: ⇧ Shift + ⌘ Cmd + Del)(Windows:Ctrl + ⇧ Shift + Del) and then pressing "Clear data".
Part Prepare the SJ core and go to the stage
CPU.1 (for users not using a FMB)
macOS: Click the dock icon for soundjack.
macOS: (The soundjack application runs quietly in the background).
Windows: Double-click the desktop shortcut icon labeled, "soundjack.exe - Shortcut".
Windows: (A system tray icon appears. A terminal window also appears. You can minimize and ignore the terminal window).
CPU.1 (for users not using a FMB) > Classic stage users
If the Soundjack website is not already open in a Vivaldi/Chrome tab, use your group's LLL shortcut/bookmark, shortcut 5 Soundjack to open https://soundjack.eu in a new Vivaldi/Chrome tab.
Log into your Soundjack account.
CPU.1 (for users not using a FMB) > One-time/occasional
Classic stage users: In the navigation menu, click "DOWNLOAD".
SJ Lite users:
Go to https://soundjack.eu and click the DOWNLOAD button in the navigation bar.
Download the latest version of the Soundjack Core (SJC) for your operating system.
Install the SJC you downloaded using the following steps:
macOS: Drag previous version(s), if any, of soundjack to the Trash.
macOS: Double-click freshly-downloaded disk image file to open.
macOS: Drag the Soundjack icon to the Applications Folder shortcut.
Windows: Remove old shortcut(s), if any, pointing to old version(s) of the SJC.
Windows: Extract .zip archive to a folder of your choice.
macOS:
Go to Applications Folder.
Ctrl-click the icon for soundjack.
Choose Open.
When the dialog box warns that the application developer is not verified, choose to Open the application anyway.
(The soundjack application runs quietly in the background).
Now with the soundjack application running,
Ctrl+click the soundjack icon in the dock.
Choose Options
Choose Keep in Dock.
Windows:
Go to the folder where you extracted the SJC.
Double-click soundjack.exe.
You might be prompted to grant soundjack permission to pass through the firewall. If so, please grant the requested permission.
(A system tray icon appears. A terminal window also appears. You can minimize and ignore the terminal window).
Create a desktop shortcut for the soundjack application:
Hold the right mouse button while dragging the soundjack.exe file to the desktop.
In the context menu that appears when you let go, choose "Create shortcuts here".
There should now be a desktop shortcut icon labeled, "soundjack.exe - Shortcut".
Upon power up, you want to allow FMB time to download available updates. Typically, three (3) minutes is enough for start-up processes. On occasion, a major update is distributed. In those cases, which I will try to notify you of, the FMB should be given ten (10) minutes to boot up and update itself upon powering up.
Once the FMB has had enough time to take care of start-up tasks, use LLL shortcut/bookmark shortcut 4 fmb menu to open http://soundjack0.local in a new Vivaldi/Chrome tab.
Please do not proceed until the webpage loads and shows three green checkmarks. You might need to press reload in Vivaldi/Chrome if the page does not initially load.
I prefer to verify in the System Status that os.update.running equals no.
CPU.2 (for FMB users) > One-time/occasional
⚠ If the previous step failed owing to a DNS resolution error (for example, the browser brings up DNS_PROBE_FINISHED_NXDOMAIN), the low-latency technology assistant for the musical ensemble should help you try a strategy like one of the following.
Try opening http://soundjack0.local on an alternative device. In Network Settings, note the private IP of the fastmusic box. If the private IP is known to be static, create a Vivaldi/Chrome bookmark labeled "4 fmb" for that private IP. In the future, the user should use this Vivaldi/Chrome bookmark when instructions refer to shortcut 4 fmb.
If nothing in the house will resolve http://soundjack0.local, use the router webpage to look for the fmb (device named soundjackLONGSERIALNUMBER). Note the private IP. If the private IP is known to be static, create a Vivaldi/Chrome bookmark labeled "4 fmb" for that private IP. In the future, the user should use this Vivaldi/Chrome bookmark when instructions refer to shortcut 4 fmb.
macOS: Look on stackexchange for advice for changing the way an Apple computer handles the .local domain (issue may exist involving Bonjour/Rendezvous).
Copying your fmb-id to your Soundjack account (already done if you purchased your FMB from Symonics GmbH)
In the row labeled "⚙ System Status", click the clipboard icon next to your FMB ID to copy your FMB ID to the clipboard.
If the Soundjack website is not already open in a Vivaldi/Chrome tab, use your group's LLL shortcut/bookmark shortcut 5 Soundjack to open https://soundjack.eu in a new Vivaldi/Chrome tab.
Log into your Soundjack account.
CPU.2 (for FMB users) > One-time/occasional (already done if you purchased your FMB from Symonics GmbH)
Click on the avatar next to your username (username is scrambled in figure below).
Scroll down and click the "profile" button.
Scroll down and click on "edit".
Scroll down anbd click on "fmb-id".
Scroll down and paste your FMB ID from the clipboard into the field labeled "fast-music-box (FMB) – ID:".
Press "Save Changes".
In the navigation bar, click on "STAGE".
When a "Local SJC not found" dialog box (see below) appears, press "OK".
CPU.3 (for FMB Pro users)
Upon power up, you want to allow FMB Pro time to download available updates. Typically, three (3) minutes is enough for start-up processes. On occasion, a major update is distributed. In those cases, which I will try to notify you of, the FMB Pro should be given ten (10) minutes to boot up and update itself upon powering up.
Once the FMB Pro has had enough time to take care of start-up tasks, use the button on your FMB Pro's touchscreen, or use LLL shortcut/bookmark shortcut 4 fmb menu to open http://soundjack0.local in a new Vivaldi/Chrome tab on your computer.
Please do not proceed until the webpage loads and shows three green checkmarks. You might need to press reload in Vivaldi/Chrome if the page does not initially load in Vivaldi/Chrome.
I prefer to verify in the System Status that os.update.running equals no.
CPU.3 (for FMB Pro users) > One-time/occasional (already done if you purchased your FMB Pro from Symonics GmbH)
In the row labeled "⚙ System Status", click the clipboard icon next to your FMB ID to copy your FMB ID to the clipboard.
If the Soundjack website is not already open in a Vivaldi/Chrome tab, use your group's LLL shortcut/bookmark shortcut 5 Soundjack to open https://soundjack.eu in a new Vivaldi/Chrome tab.
Log into your Soundjack account.
CPU.3 (for FMB Pro users) > One-time/occasional (already done if you purchased your FMB Pro from Symonics GmbH)
Click on the avatar next to your username (username is scrambled in figure below).
Scroll down and click the "profile" button.
Scroll down and click on "edit".
Scroll down anbd click on "fmb-id".
Scroll down and paste your FMB ID from the clipboard into the field labeled "fast-music-box (FMB) – ID:".
Press "Save Changes".
In the navigation bar, click on "STAGE".
When a "Local SJC not found" dialog box (see below) appears, press "OK".
Part Navigating the stage
Part Navigating Soundjack Lite
Wait for a numerical IP address to appear next to the local network interface icon.
Check that the profile setting is "extended".
Check that the groups pull-down menu is set to "".
Open Soundjack Lite in a Vivaldi/Chrome tab by going to https://soundjack.eu and clicking the SOUNDJACK-LITE button in the navigation bar.
When soundjack.eu pops up a dialog box that says, "Enter your username", choose a username by which you would like to be identified for the current session. The username is non-persistent.
SJTG Preview image credit: Dr. Alex Carôt (permalink)
One-time/occasional
If you prefer to have Soundjack automatically answer each incoming call (rather than requiring you to explicitly press "Accept" for each incoming call you'd like to answer), click the reaction to incoming call pulldown menu and select "accept any call".
Set the audio input to your HiFi Berry.
Set the audio output to your HiFi Berry.
For the capture/send channels setting, use "capture/send channels: 2 (stereo)""capture/send channels: 2 (mono mix)".
Set playback channels to "playback channels: 2".
There aren't really "first-time" settings. There is no account with which persistent settings could be associated.
Set the audio input to your .
Set the audio output to your .
Check that the buffer is set to "moderate delay: 256".
The rehearsal manager might request changes to this setting during rehearsal.
For the capture/send channels setting, use "capture/send channels: 2 (stereo)""capture/send channels: 2 (mono mix)".
Check that the sample buffer is set to "sample buffer: 64".
If Soundjack is being finicky, you might try setting the sample buffer to "sample buffer: 256" and then back again to "sample buffer: 64".
Fiber internet user: Check that the network buffer is set to "network buffer: 128".Cable internet user: Check that the network buffer is set to "network buffer: 256."
The rehearsal manager might request changes to this setting during rehearsal.
One-time/occasional: Check that the audio codec is set to "codec: OPUS 96 kbps".
MIC.1 (for headworn condenser mic users)
Make sure each microphone is worn.
ALIGN: each microphone points at corner of intended mouth, NOT smushed against side of face.
MIC.2 (for side-address condenser mic users)
ALIGN: each microphone is vertically oriented.
ALIGN: each mouth is at same height as intended microphone grill.
ALIGN: each mouth points at intended microphone grill, and each microphone grill (logo side) points at intended mouth.
ALIGN: each mouth is 6"-12" away from intended microphone grill.
MIC.3 (for dynamic mic users)
ALIGN: each mouth points at intended microphone grill, and each microphone grill points at intended mouth.
ALIGN: each microphone is about 1 inch away from intended mouth.
MIC.4 (for omnidirectional condenser mic users)
ALIGN: Aim each mouth at the omnidirectional condenser microphone.
ALIGN: Try keeping each mouth five (5) feet from microphone.
ALIGN: It doesn't super matter in which direction the microphone itself is aimed even though there is some variation in equalization with direction.
Make sure headphones are worn.
The stage displays all the people you can call right now. In the row with my name,
make a note of and remember the following.
The small square in the middle, which might have the label "auto" nearby, is used to turn on or off the automatic jitter buffer.
The pulldown menu to the right of the automatic jitter buffer checkbox is the size of the jitter buffer (expressed as a number of buffered packets).
If you would like to request to call someone individually, click on their play/connect button.
If a mass server is available for a session, the mass server will appear in the stage as SERVER. To connect to the server, click the play/connect button just for the server.
SERVER
For each site to which you are connected, you can use any of the following strategies to choose an initial configuration for the jitter buffer. If you hear a lot of garbled audio, you can experiment further.
Jitter buffer strategy A ("I'm overwhelmed; just pick something for me to try")
Click to put a ☑ checkmark in the automatic jitter buffer box for audio from the site of interest.
The automatic jitter buffer size will dynamically adjust based on network conditions.
Even while the jitter buffer size is automatically adjusting, you can still use the pulldown menu to change the number of buffered packets.
As of 2022 January, the automatic jitter buffer adjustment can be tricked in certain situations into a runaway condition in which the jitter buffer size increases in a somewhat ratchet-like fashion leading to lower performance than achieved by the remaining options.
Jitter buffer strategy B
Leave the automatic jitter buffer box for audio from the site of interest unchecked.
Make sure the size of the jitter buffer is set to 4 buffered packets.
This strategy is easy to use and prevents a runaway ratchet-like increase of the jitter buffer size, but this strategy will not automatically adjust the jitter buffer to accommodate mid-session variation in jitter.
Jitter buffer strategy C
Leave the automatic jitter buffer box for audio from the site of interest unchecked.
Start out with the size of the jitter buffer set to 4 buffered packets.
Increase and/or decrease the number of buffered packets until the minimum number of buffered packets that achieves an acceptably stable (does not need to be perfectly free of garbling) audio stream is selected.
Variations in network performance might occasionally require adjusting the jitter buffer size in the midst of a session.
This strategy requires more effort to use.
To disconnect from a site, go to that site's row and click the green button.
Starting up a mass server
Checking with other ensembles who might like to use the server
Please leave a message in the Soundjack facebook group to check whether there is any schedule conflict with the time you'd like to book the server.
"Hello, would like to book the Virginia(replace location as needed) server at Date Time Timezone. Is there any conflict?"
After you are logged into Soundjack, go to the navigation bar at the top of the page and click on Groups. Right-click on "Create Mass Server," and choose "Open link in new tab".
Go to the "Create mass server" tab that has just appeared.
Select the Duration in hours.
It is a good idea to pad a reservation with an extra hour. For example, for a rehearsal running from 7:30p-8:30p, open the server for two hours from 7:00p until 9:00p. This way, musicians can make sure that their equipment is successfully connected before rehearsal and the server doesn't abruptly shut down in the midst of conversation at the end of the rehearsal.
Select the Server location (choose a location with fastest routing to musicians in the rehearsal).
Make sure the Group listed is .
Click "Book Now".
A message should appear indicating that the mass server will be ready in about 90 seconds.
Mass server booting up . . .
You successfully booked your mass server. In about 90 seconds it should show up in your group. Make sure to re-enter the stage after bootup completion. For further information please check the server tab under info.
Refresh the stage and connect to mass server
After about 90 seconds, reload the Stage to get a fresh view of your group, .
The mass server should appear as a user with name SERVER.
After someone clicks the play/connect button for SERVER, green highlighting on their username indicates that they have connected to the mass server.
Adjusting server settings: Auto jitter buffer
In the navigation bar at the top of the page, click Groups. Right-click "Server Panel", and choose "Open link in new tab".
Go to the "Server Panel" tab that has just appeared.
You will initially see settings for the server as a whole. After a while, settings for individual users will appear underneath.
For day-to-day work, click the auto jitter buffer checkbox for each user once they connect.
If it seems that the automatic adjustment of the jitter buffer is not working, change the jitter buffer setting for the whole server to something else (you can then switch the overall server jitter buffer setting back if you like).
If the automatic jitter buffer setting seems to want to choose a high (4 buffered packets is not really "high", but 16 buffered packets, for example, is definitely "high") number of buffered packets for a particular user, ask that user to increase their network buffer. After the server's automatic jitter buffer setting is allowed some time to adjust in response, see whether the latency reported on the server panel for the user of interest has improved.
If the size of the jitter buffer (as a number of buffered packets) for audio from a particular user keeps trying to hover around, say, 16, ask the user whether they have connected the device running Soundjack directly using an Ethernet cable to their main router (only an Ethernet switch can intervene--there should be no Google Home or other extender/repeated), whether they have turned off WiFi, and whether they have turned off an VPN.
If you have time, you could instead manually adjust the jitter buffer setting for each individual user.
Adjusting server settings: Adjusting levels to avoid clipping
It would be ideal to have each individual singer check in and say something to make sure they are at least audible.
The steps below do not necessarily ensure that every singer is audible. The steps below are meant merely to prevent really annoying clipping.
Have the chorus perform warm ups that explore the highest volumes that are likely to be sung later during rehearsal.
This step can be done casually as part of a routine warm up. It is not necessary to have the chorus constantly sing loudly.
In the server panel, look for clipping by looking for any individual user level meters that at least sometimes turn pink.
Write down a list of users with pink level meters.
For each user just listed,
Check microphone placement:
Type of microphone
Placement
Headworn condenser
No less than an inch from corner of mouth, aimed at mouth
Side-address condenser
6-12 inches from mouth, with logo facing user, and with major axis of microphone perpendicular to the line connecting mouth to the grill
Dynamic
In front of mouth, 1 inch from mouth, facing in toward mouth
Omnidirectional condenser
Orientation of microphone is not that crucial, start with mouth aimed at microphone and with mouth and microphone separated by 5 feet
If needed, decrease mic gain on the singer's FMB Pro(or external mixer) so that the musician's audio does not clip.
Have the chorus continue performing warm ups that explore the highest volumes that are likely to be sung later during rehearsal.
In the server panel, check that there no longer any pink seen in level meters.
Ask the chorus whether anyone notices any distortion.
Instructions for shutting down the server are located near the end of this page.
The right-hand panel of Soundjack Lite displays everyone you are connected to right now.
To add a player,
Click "⊕ Add player".
Type the player's username.
Press ENTER.
To disconnect from a player, go to that player's row and click their ⨂ button (far right).
Part Starting VDO.Ninja lowish-latency video
Typically you do not use both VDO.Ninja and Zoom. VDO.Ninja is useful for conducting. Zoom is one of the ways to allow video to be shared among a mixture of Soundjack and non-Soundjack users.
Use your group's LLL shortcut/bookmark shortcut 1 VDO.ninja 1A: 🎤 🐌 to open VDO.ninja in a new Vivaldi/Chrome tab.
Conductors will probably prefer video mode 1B: 👋 🐌 or 1C: 👋 🐇.
One-time/occasional: You might be asked to give VDO.Ninja permission to access your camera and microphone.
Only give VDO.ninja permission to access your camera.
Do NOT give VDO.ninja permission to access your microphone.
Use the pulldown menu for "Video Source" to choose your preferred camera.
Once the green START button appears, verify that your video preview appears as desired.
Press START.
Part Starting Zoom high-latency video
Typically you do not use both VDO.Ninja and Zoom. VDO.Ninja is useful for conducting. Zoom is one of the ways to allow video to be shared among a mixture of Soundjack and non-Soundjack users.
Use your group's LLL shortcut/bookmark shortcut Z zoom to launch Zoom.
Near the bottom-left corner, make sure the camera icon is not slashed. If needed, press "Start video".
Near the bottom-corner, click the caret on the microphone button, then choose "Leave Computer Audio".
Part Shutting down
Close the browser tab used for VDO.Ninja.
Close Zoom:
Click the " Leave " button.
Click the " Leave meeting " button that then appears.
Shutting down the server
The server will shut itself down at the end of the booked duration. If you are done using the server before the reservation is scheduled to end, please, as a courtesy to other potential users, go to the Server Panel and click the big red disk with a white diagonal cross to shut down the server.
Leave the Soundjack STAGE.
Close the Soundjack Lite tab.
CPU.1 (for users not using an FMB)
Windows:Right-click the soundjack system tray icon. Select Shut down Soundjack. macOS:Ctrl-click the Soundjack icon on the dock. Choose Quit.
On the FMB Pro, check that 48-V phantom power is OFF.
CPU.2 (for FMB users)
Turn your FMB OFF: Hold-press the power button on the FMB for a few seconds. The red light on the front of the FMB will turn off briefly, turn back on, and then after some seconds finally turn off for good.
CPU.3 (for FMB Pro users)
Turn your FMB Pro OFF: Hold-press the power button on the FMB for a few seconds. The light on the front of the FMB will turn off briefly, turn back on, and then after some seconds finally turn off for good.
 Choose equipment to use with Jamulus
  Choose equipment to use with SonoBus
  Choose equipment to use with Soundjack
  Setup instructions
 for
Setup instructions
Setup instructions for 1-page general reference
Troubleshooting
Legacy documentation
1-page general reference
Troubleshooting
Legacy documentation


 appears. A terminal window also appears. You can minimize and ignore the terminal window).
 to the Applications Folder shortcut.


 icon.
icon. setting is "extended".
 pull-down menu is set to "".
 pulldown menu and select "accept any call".
 to your
  to your
  setting, use
  is set to "moderate delay: 256".
 is set to "network buffer: 128".
 is set to "codec: OPUS 96 kbps".


 button.


